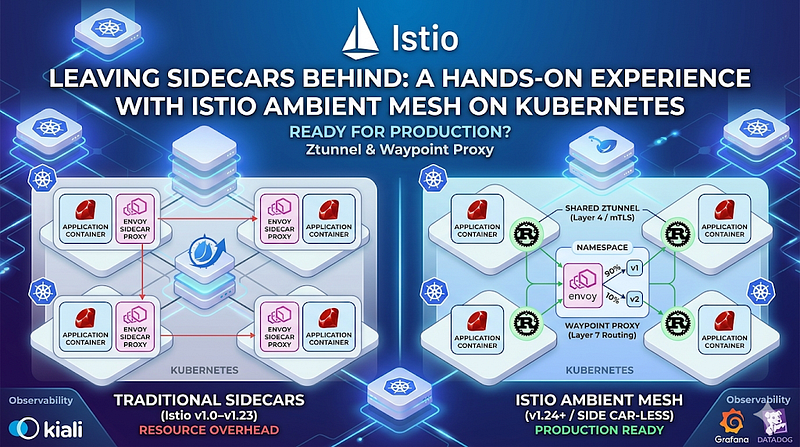
This article, I’ll share my lab notes from deploying this sidecar-less architecture on a self-hosted Kubernetes v1.35.1 cluster, complete with a traffic routing simulation and observability setup.
For those of us managing microservices infrastructure daily, Istio is likely a familiar name. As the most popular service mesh, it offers incredible observability, security (mTLS), and traffic routing features. However, its legacy architecture - forcing an Envoy proxy as a sidecar into every application pod - often brought new headaches: bloated CPU and memory consumption, along with operational complexity when restarting pods just to update the proxy.
Fortunately, Istio’s latest innovation is here and has reached General Availability (GA). Enter Istio Ambient Mesh.
What is Istio Ambient Mesh?
Unlike the traditional sidecar approach that crams everything into the pod, Ambient Mesh splits networking responsibilities into two distinct layers:
- Layer 4 (Core Security): ztunnel This is a lightweight, Rust-based DaemonSet running on each node. Its sole job: securing pod-to-pod communication using Mutual TLS (mTLS) and handling basic TCP routing. Since it operates at the node level, your applications remain completely unaware of its presence.
- Layer 7 (Advanced Routing): Waypoint Proxy If your app needs specific features like HTTP traffic splitting, circuit breaking, or header manipulation, Istio leverages a separate component called the Waypoint Proxy. This is a standalone Envoy pod allocated per namespace or service account.
The main advantage? Drastic resource efficiency and the ability to onboard applications into the service mesh without restarting any pods (zero-downtime onboarding).
Hands-on Lab: Cluster Preparation Let’s get our hands dirty. Ensure your cluster has Helm installed and is compatible with the Kubernetes Gateway API.
- Install Gateway API CRDs
kubectl get crd gateways.gateway.networking.k8s.io &> /dev/null || \ { kubectl kustomize "github.com/kubernetes-sigs/gateway-api/config/crd/experimental?ref=v1.2.0" | kubectl apply -f -; } - Install the Control Plane & Ztunnel (L4)
We install the Istio core, the CNI component (to intercept traffic), and ztunnel using the ambient profile.
helm repo add istio https://istio-release.storage.googleapis.com/charts
helm repo update

helm install istio-base istio/base -n istio-system --create-namespace --wait
helm install istiod istio/istiod -n istio-system --set profile=ambient --wait
helm install istio-cni istio/cni -n istio-system --set profile=ambient --wait
helm install ztunnel istio/ztunnel -n istio-system --wait
Simulating a Canary Deployment (Layer 7)
To prove its capabilities, we’ll create a dev namespace, enable Ambient Mesh, and simulate a traffic split (90% to v1, and 10% to v2) using the standard httpbin app and a sleep client.
-
Prepare the Namespace & Enable Ambient Mesh
With just this one label, all pods inside the dev namespace are automatically secured with mTLS by ztunnel.
kubectl create namespace dev kubectl label namespace dev istio.io/dataplane-mode=ambient -
Deploy the Waypoint Proxy
Since we need HTTP traffic splitting (L7), we deploy a Waypoint in that namespace.
# waypoint.yaml
apiVersion: gateway.networking.k8s.io/v1
kind: Gateway
metadata:
  name: waypoint
  namespace: dev
spec:
  gatewayClassName: istio-waypoint
  listeners:
  - name: mesh
    port: 15008
    protocol: HBONE
(Apply this using kubectl apply -f waypoint.yaml)
-
Deploy the Target Applications
We deploy httpbin (v1 and v2) along with the sleep pod to generate requests. Remember, these pods will run purely as 1/1 containers (no sidecars!). After deploying, we route their HTTP traffic to the Waypoint Proxy using the istio.io/use-waypoint label. (Note: You can insert the full YAML manifests for the httpbin and sleep apps here).
-
Create Routing Rules (VirtualService) We split the traffic 90/10 using a combination of a DestinationRule and a VirtualService.
# VirtualService Routing Rules
apiVersion: networking.istio.io/v1alpha3
kind: VirtualService
metadata:
  name: httpbin
  namespace: dev
spec:
  hosts:
  - httpbin
  http:
  - route:
    - destination:
        host: httpbin
        subset: v1
      weight: 90
    - destination:
        host: httpbin
        subset: v2
      weight: 10
Proving the Traffic Split with Kiali
To see the magic visually, I installed Kiali, Istio’s topology observability dashboard.
Here to install Kiali, you can use the following command:
helm install kiali-server kiali/kiali-server -n istio-system --set auth.strategy=anonymous --waitAnd then access the Kiali dashboard using port forwarding:
kubectl port-forward -n istio-system svc/kiali-server 20001:20001Access on your browser: http://localhost:20001
By continuously firing curl requests from the sleep pod to the httpbin service, Kiali immediately captured the network flow. The dashboard clearly showed that 90% of the traffic was hitting httpbin v1, while 10% was routed to v2, confirming that our Layer 7 routing rules were working perfectly without any sidecar overhead. bellow is the screenshot of Kiali showing the traffic split in action.
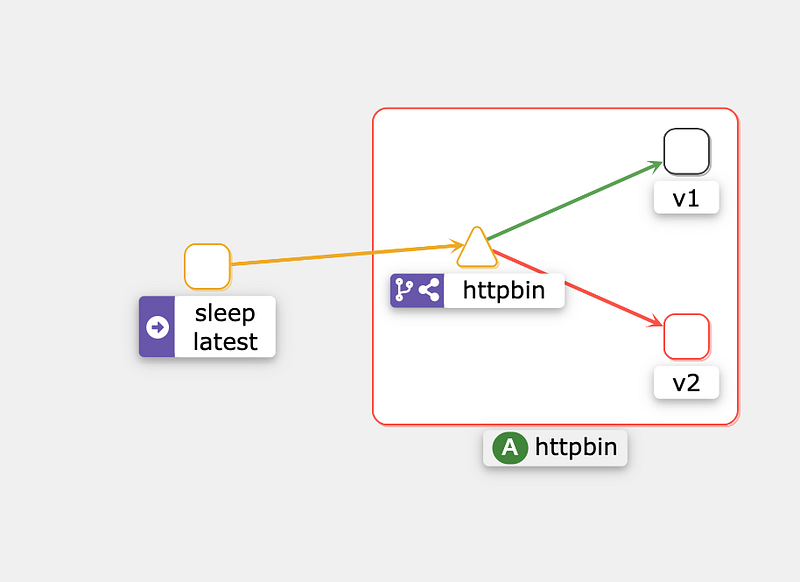 From the Kiali dashboard, you can clearly see the traffic originating from sleep, passing through the httpbin VirtualService (executed by the Waypoint Proxy), and splitting beautifully towards v1 (90%) and v2 (10%). The green “A” badge on the Kiali interface also validates that this application is actively running in Ambient Mesh mode.
Conclusion
This self-hosted cluster experiment proves that Istio Ambient Mesh is more than just hype. Decoupling the mTLS logic to the node-level ztunnel frees applications from sidecar overhead, while Waypoint Proxies can still be summoned on-demand for advanced routing needs. If you are designing a new microservices network architecture, Ambient Mesh is highly worthy of becoming your future deployment standard.